Last Updated on 06/06/2020 by Grant Little
I have been a Mac guy for a long time now, however I was starting to find the relative hardware costs were getting higher and was able to find equivalent hardware much cheaper for a PC.
My next choice of OS would have been Linux, however I thought I would give Windows 10 a go. It seems to be a lot better OS than Windows in the XP days!
I still wanted to do most of my “development” work within a Linux (Linux Mint – based on Ubuntu) environment, therefore I wanted to use a Virtual Machine to run this. I already had Docker Desktop installed which requires Hyper-V. I quickly found that I couldn’t run Oracle VirtualBox or VMWare Workstation when Hyper-V is enabled. Therefore I thought I would install Linux within Hyper-V.
This worked, however I found I was unable to create a usable desktop environment as Hyper-V wouldn’t dynamically scale the screen resolution based on the window size.
After doing a fair bit of research, although there are some workarounds that kinda work, I couldn’t find a solution that worked as I wanted, well not when you use Remote Desktop. The solution was to use Tiger VNC. This comes with dynamic desktop scaling included and I have used it in the past and generally works for general development work.
A word of warning though, this approach does not use native 3D acceleration, so if you require these desktops capabilities, you’ll have to look elsewhere!
So here is the solution I came up with
First of all create a virtual machine for your Ubuntu operating system (I’m using Linux Mint). I’m not going to go through this as it’s really outside the scope of this article!
Use the Hyper-V client to access the desktop, you can then run the following within a Terminal session:-
sudo apt install -y openssh-serverThen get the IP address of the machine using the following command:-
~$ ip addr
1: lo: <LOOPBACK,UP,LOWER_UP> mtu 65536 qdisc noqueue state UNKNOWN group default qlen 1000
    link/loopback 00:00:00:00:00:00 brd 00:00:00:00:00:00
    inet 127.0.0.1/8 scope host lo
       valid_lft forever preferred_lft forever
    inet6 ::1/128 scope host
       valid_lft forever preferred_lft forever
2: eth0: <BROADCAST,MULTICAST,UP,LOWER_UP> mtu 1500 qdisc mq state UP group default qlen 1000
    link/ether 00:15:5d:01:e1:07 brd ff:ff:ff:ff:ff:ff
    inet 192.168.251.78/28 brd 192.168.251.79 scope global dynamic noprefixroute eth0
       valid_lft 86165sec preferred_lft 86165sec
    inet6 fe80::7507:764:1640:6dfe/64 scope link noprefixroute
       valid_lft forever preferred_lft forever
In my case the IP address is 192.168.251.78
To make it easier to copy and paste commands, rather than continuing to access the terminal via the Hyper-V client Window. I instead use SSH to login via the terminal. I also have the Windows Subsystem for Linux installed, so I used the Ubuntu app to run the following commands.
First log onto the Virtual Machine
ssh <username>@<ip-address>In my case this was
ssh grant@192.168.251.78Once logged in, run the following commands
sudo apt install tigervnc-standalone-server tigervnc-common vim nanoThen you need to set a password with vncpasswd
$ vncpasswd
Password:
Verify:
Would you like to enter a view-only password (y/n)? n
Now create a service file so the vncserver starts automatically at startup
/etc/systemd/system/vncserver@:1.serviceAdd the following contents to that file
[Unit]
Description=Remote desktop service (VNC)
After=syslog.target network.target

[Service]
Type=simple
User=<username>
PAMName=login
PIDFile=/home/%u/.vnc/%H%i.pid
ExecStartPre=/bin/sh -c '/usr/bin/vncserver -kill %i > /dev/null 2>&1 || :'
ExecStart=/usr/bin/vncserver %i -geometry 2560x1440 -alwaysshared -fg -localhost no
ExecStop=/usr/bin/vncserver -kill %i

[Install]
WantedBy=multi-user.target
Change <username> value to the user you will be using to log in with. Now reload the systemctl daemon and enable the service
sudo systemctl daemon-reload
sudo systemctl enable vncserver@:1
There is also a problem that when resizing the window the underlying vnc/rdp service asks for some permissions. This can be annoying. To prevent this, you need to create the following file
/etc/polkit-1/localauthority/50-local.d/45-allow-colord.pklaand these contents to it
[Allow Colord all Users]
Identity=unix-user:*
Action=org.freedesktop.color-manager.create-device;org.freedesktop.color-manager.create-profile;org.freedesktop.color-manager.delete-device;org.freedesktop.color-manager.delete-profile;org.freedesktop.color-manager.modify-device;org.freedesktop.color-manager.modify-profile
ResultAny=no
ResultInactive=no
ResultActive=yes
You can now reboot the virtual machine
sudo rebootBack on your Windows 10 host, you need a VNC viewer to access the desktop. TigerVNC supports the dynamic scaling we require. Therefore we will be using it. You can download it from GitHub. Just look for the following text “Binaries are available from bintray:”. From the download page, you can download the vncviwer application. In most cases this will be vncviewer64-x.x.x.exe, for example vncviewer64-1.10.1.exe
You can simply download the application. It is a standalone executable and requires no installation.
Run the application and you will see the following:-
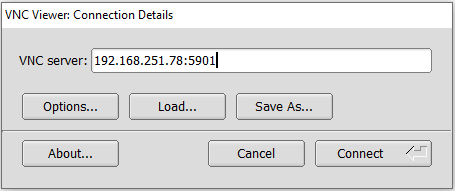
Replace the IP address of your virtual machine in the above, but the port should remain the same. So you will end up with a string in the form
<ip-address>:5901Before connecting, you can change some of the settings, by clicking on “Options”. Specifically the settings around full screen are important. Also take note of the Full Screen hot key. By default this is “F8” however you can change that if you choose.
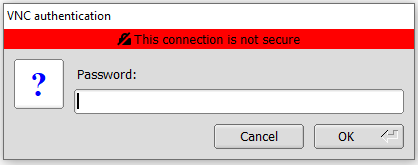
It will prompt you for your password you created earlier using vncpasswd
That’s it! You should be able to rescale your desktop window now and create a more “usable” desktop environment.
NOTE: When connecting using the mechanism, the connection is unencrypted and not secure. For many people working on their desktops this may be fine as long as they are using the default switch on Hyper-V. If you directly exposing the host out to the rest of your network then this is not recommended. I will be writing another article soon on how to make this more secure for either everyday use or for this specific use case.