
Last Updated on 30/08/2020 by Grant Little
Introduction
Often when using Spring Boot it is convenient to put a common piece of functionality within a shared library. That library can then be used in actual applications and any Spring Beans defined within the library automatically configure themselves rather than having to manually create those Beans each time.
So how is that different to a standard Java library? A standard Java library provides reusable classes and functions. A Spring Boot Starter library provides reusable Spring Beans.
Spring comes with many of these “starter” libraries out of the box. There are ones for
- Security
- Data Access (JDBC & JPA for example)
- Web
- Actuators
However sometimes you want some custom functionality. You may have your own organisation wide security model that you want to enforce on all applications. Creating a library that automatically applies the Beans and configurations within it for all applications within an organisation makes sense.
There are 2 common approaches to this to a starter library.
- Create a Spring Factory within meta-data. This is most common model.
- Define an annotation that can be referenced within your application.
The first one is the most commonly used approach, especially within the Spring ecosystem. However you can also see the other approach on occasions within the Spring ecosystem as well.
In this article we will cover both. There are common aspects to both approaches, so we will look at those first and then we will address the specifics of each approach separately.
Implementation
Common Implementation Details
First off you will need to create a project structure. You can use any build tool you choose, we will be using Maven here, but this same concepts apply to Gradle or others.
You will generally need to add the following dependencies:-
<?xml version="1.0" encoding="UTF-8"?>
<project xmlns="http://maven.apache.org/POM/4.0.0"
         xmlns:xsi="http://www.w3.org/2001/XMLSchema-instance"
         xsi:schemaLocation="http://maven.apache.org/POM/4.0.0 http://maven.apache.org/xsd/maven-4.0.0.xsd">
    <modelVersion>4.0.0</modelVersion>

    <groupId>org.simtp</groupId>
    <artifactId>example-starter-library</artifactId>
    <version>0-SNAPSHOT</version>

    <parent>
   	    <groupId>org.springframework.boot</groupId>
   	    <artifactId>spring-boot-starter-parent</artifactId>
            <version>2.3.3.RELEASE</version>
    </parent>

    <dependencies>
        <dependency>
            <groupId>org.springframework.boot</groupId>
            <artifactId>spring-boot-autoconfigure</artifactId>
        </dependency>
    </dependencies>
</project>
We continue to use the “spring-boot-starter-parent” as our parent project. This will take care of most of the correct version number for us.
A word of caution. The Spring Initializr for example creates “applications”. These typically have a different package structure from a “library” and you will likely have issues. Using an empty Maven or Gradle project will likely serve you better.
With our basic project in place, we now need to create a Configuration class:-
import org.springframework.context.annotation.Bean;
import org.springframework.context.annotation.ComponentScan;
import org.springframework.context.annotation.Configuration;

@Configuration
@ComponentScan
public class ExampleConfiguration {

    // Create your Bean definitions here e.g.
    @Bean
    public MyBean myBean() {
        return new MyBean();
    }
}
Choose a package for your class that is specific to your library and isn’t used elsewhere. The reason being it is common to add a “@ComponentScan” annotation. If you share this library with other components on your classpath, and those components share the same package, then Spring will consider them as candidates for configuring as well.
Add whatever configuration and Beans you require within this class to meet your needs.
Conditional Configurations
We now have the building blocks in place that allow us to define our required configuration. However you sometimes don’t want those configuration classes to be used in all circumstances. You might want your Configuration to be used if there is a specific class on the classpath for example.
There are numerous ways of defining “conditionals” which we won’t consider here. However a common use case is to allow your Configuration to be explicitly disabled via some configuration property. So we will use that as an example.
Let’s say we want an option to disable the automatic configuration of our class for a specific application in certain environments. We can use configuration properties to define this within our application.properties file and based on Profiles. So if we define the following property in our application, the configuration should not be applied:-
org.simtp.example.config.enabled=false
We need to add a conditional to our class to allow this configuration to be controlled by this property.
@ConditionalOnProperty(
        value = "org.simtp.example.config.enabled",
        havingValue = "true",
        matchIfMissing = true
)
public class ExampleConfiguration {
    //...
}
Auto Configuring your Library
Using Spring Factory
The most common approach to configure your library to auto configure is to use a Spring Factory configuration.
Spring looks for a file within the library jar in the following location:-
META-INF/spring.factories
How you ensure that file is there is a bit dependent on your build tool. In our case we are using maven so you need to add the file to your src/main/resources folder.
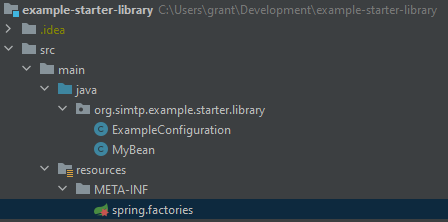
The content of this file is basically a property. The key is “org.springframework.boot.autoconfigure.EnableAutoConfiguration” and the value is the fully qualified name of your class. In our case “org.simtp.example.starter.library.ExampleConfiguration”
org.springframework.boot.autoconfigure.EnableAutoConfiguration=\
org.simtp.example.starter.library.ExampleConfiguration
Using Annotations
The other less common approach is not quite auto configuration, in that you need to declare within your application that you want to use the Configuration within library.
To do this you will need to define your own custom annotation. In our example we will call that annotation “EnableExampleConfiguration”. The contents of our example is as follows:-
@Documented
@Retention(RetentionPolicy.RUNTIME)
@Target(ElementType.TYPE)
@Import(ExampleConfiguration.class)
public @interface EnableExampleConfiguration {}
The particularly important bit here is the
@Import(ExampleConfiguration.class)
This will tell Spring to import the Configuration class we have defined.
All that is left is to use the annotation within your application. This is really simple. Typically next to your @SpringBootApplication declaration apply the annotation. For example:-
@SpringBootApplication
@EnableExampleConfiguration
public class MyApplication {
    //.. Application configuration here
}
Conclusion
You should now have the ability to create a library that you can use throughout your applications to provide common and reusable functionality and have the services available within that library automatically start.
The code is located in GitLab – https://gitlab.com/simtp/example-starter-library