

Last Updated on 21/05/2024 by Grant Little
Overview
Apache Ignite is an open source distributed database, in memory data store and compute platform.
In this post we will be looking at how we can configure Apache Ignite within a Spring Boot component (or starter module).
Instructions
I have a GitLab project which you can clone to get access to the source code associated with this post.
You will need to create a basic Spring Boot project. You can have a look at the previous post I did on using Spring Initalizr for this.
Dependencies
From there you will need to add the required Apache Ignite dependencies. In this case you will need ignite-core and ignite-spring. I’m using Maven but you can change this to suit your build tool of choice.
<properties>
  <!-- Update this to the latest version -->
  <ignite.version>2.8.1</ignite.version>
</properties>

<dependencies>
  <dependency>
    <groupId>org.apache.ignite</groupId>
    <artifactId>ignite-core</artifactId>
    <version>${ignite.version}</version>
  </dependency>
  <dependency>
   <groupId>org.apache.ignite</groupId>
   <artifactId>ignite-spring</artifactId>
   <version>${ignite.version}</version>
  </dependency>
</dependencies>IgniteConfigurer
First off, we will follow a common pattern used within Spring Boot and that is to create a “Configurer” that can be used to tailor a centrally configured IgniteConfiguration object. It’s a simple interface:-
public interface IgniteConfigurer {
    void configureIgnite(IgniteConfiguration igniteConfiguration);
}We will use this interface to mark classes that can take part in the configuration of Apache Ignite. You could either do this on a configuration class:-
@Configuration
public class Cache1Configuration implements IgniteConfigurer {

    public static final String CACHE1_NAME = "cache1";

    @Override
    public void configureIgnite(IgniteConfiguration igniteConfiguration) {
        CacheConfiguration<Long, String> cacheConfiguration = new CacheConfiguration<>(CACHE1_NAME);
        Utils.addCacheConfiguration(igniteConfiguration, cacheConfiguration);
    }
}In the above example we are creating a new CacheConfiguration to IgniteConfiguration. Note that we have a utility class method to “addCacheConfiguration”. This is because the standard “setCacheConfiguration” will replace any already defined CacheConfiguration instances already defined. So we use this utility method to add a new configuration without replacing previously defined instances.
public static <K, V> void addCacheConfiguration(IgniteConfiguration igniteConfiguration, CacheConfiguration<K, V> cacheConfiguration) {
        @SuppressWarnings("rawtypes")
    List<CacheConfiguration> cacheConfigurations = igniteConfiguration
            .getCacheConfiguration() == null
            ? new ArrayList<>() : new ArrayList<>(Arrays.asList(igniteConfiguration.getCacheConfiguration()));
    cacheConfigurations.add(cacheConfiguration);
 igniteConfiguration.setCacheConfiguration(cacheConfigurations.toArray(CacheConfiguration[]::new));
}Another approach to define an IgniteConfigurer by using a lambda expression:-
public static final String CACHE2_NAME = "cache2";

@Bean
public IgniteConfigurer cache2IgniteConfigurer() {
    return igniteConfiguration -> {
        CacheConfiguration<Long, String> cacheConfiguration = new CacheConfiguration<>(CACHE2_NAME);
        Utils.addCacheConfiguration(igniteConfiguration, cacheConfiguration);
    };
}We should create a new IgniteConfigurer for each independent configuration we want to change within Ignite. Examples might be:-
- Logging
- Caches
- Services
- Security
Ignition
We will use these IgniteConfigurer instances to actually configure a new Ignite instance. To perform this we first need to get access to these IgniteConfigurers. In our case we will define a new IgniteModularConfiguration that will have those instances injected via a constructor:-
@Configuration
public class IgniteModularConfiguration {

    final private Set<IgniteConfigurer> igniteConfigurers;

    public IgniteModularConfiguration(Set<IgniteConfigurer> igniteConfigurers) {
        this.igniteConfigurers = igniteConfigurers;
    }
}A standard Apache Ignite configuration would commonly use the Ignition class
Ignition.start(igniteConfiguration)to initialize Ignite. However as we want to take advantage of Spring, we therefore need to use the special SpringIgnite class
IgniteSpring.start(igniteConfiguration, applicationContext)This needs access to the ApplicationContext. Therefore we will change our IgniteModularConfiguration class to implement ApplicationContextAware
@Configuration
public class IgniteModularConfiguration implements ApplicationContextAware {
    private ApplicationContext applicationContext;

    @Override
    public void setApplicationContext(
            @NotNull ApplicationContext applicationContext
    ) throws BeansException {
        this.applicationContext = applicationContext;
    }
}Putting this all together gives us this:-
@Configuration
public class IgniteModularConfiguration implements ApplicationContextAware {

    public IgniteModularConfiguration(Set<IgniteConfigurer> igniteConfigurers) {
        this.igniteConfigurers = igniteConfigurers;
    }

    private ApplicationContext applicationContext;

    final private Set<IgniteConfigurer> igniteConfigurers;

    @Override
    public void setApplicationContext(
            @NotNull ApplicationContext applicationContext
    ) throws BeansException {
        this.applicationContext = applicationContext;
    }

    @Bean
    public IgniteConfiguration igniteConfiguration() {
        IgniteConfiguration config =  new IgniteConfiguration();
        igniteConfigurers.forEach(configurer -> configurer.configureIgnite(config));
        return config;
    }

    @Bean
    public Ignite ignite() throws IgniteCheckedException {
        return IgniteSpring.start(igniteConfiguration(), applicationContext);
    }
}Using as a Spring Boot Starter
If you want to use this pattern within a straight application you can. However it can also be within a library (jar file) and that library can then be reused across numerous applications.
There are generally 2 methods of initialising the configuration:-
- Using Spring Auto Configuration
- Using an Annotation
Using Auto Configuration
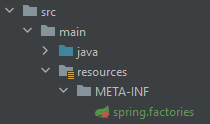
To use Spring Auto Configuration, you need to need to declare a META-INF/spring.factories file to be included in your jar file. In Maven this is can be added under src/main/resources/META-INF/spring.factories
Within the file create the following entry
org.springframework.boot.autoconfigure.EnableAutoConfiguration=\
org.simtp.demo.spring.boot.ignite.demo.IgniteModularConfigurationReplace the last line with the fully qualified class name.
Once your jar is created, Spring will scan for this file read the contents and automatically load the Configuration class defined
Using an Annotation
If you want a bit more control of when the Configuration is loaded you can use an Annotation and then add that annotation to you main application configuration.
To start with, create a simple annotation like the following:-
import org.springframework.context.annotation.Import;
import java.lang.annotation.*;

@Retention(RetentionPolicy.RUNTIME)
@Target(ElementType.TYPE)
@Documented
@Import(IgniteModularConfiguration.class)
public @interface EnableApacheIgnite {}The @Import part is the important part. It forces Spring to load the defined Configuration class. In our case the Configuration for Apache Ignite. Simply replace the class name with your equivalent.
You can then use this annotation on your application to enable Apache Ignite.
@SpringBootApplication
@EnableApacheIgnite
public class SpringBootIgniteDemoApplication {

    public static void main(String[] args) {
        SpringApplication.run(SpringBootIgniteDemoApplication.class, args);
    }

}Conclusion
In this article we have covered how to configure Apache Ignite using Spring Boot in a general way, where the Apache Ignite configuration does not need to know all the details of all the possible configurations ahead of time. Instead they are evaluated at startup time. This allows this configuration to be used as a library and reused across numerous applications.